Serial
Number Location
The frame serial number (VIN - Vehicle
Identification Number) is stamped on the right side of the steering
head pipe. The engine serial number is located on the right
side of the crankcase.
Manuals
Before
doing any work on your motorcycle, it is recommended that you obtain
the Suzuki or Haynes manual for your specific model. These are
available through many sources. The Haynes manual is available
through Holeshot,
Amazon.com,
and most other book suppliers. Your local Suzuki dealer should
be able to order you the Suzuki manual. The manufacturers
manual is generally considered to be better but also costs
significantly more money. Also note that the Suzuki manual is
actually just a bunch of three hole punched pages and requires a 3
ring binder to hold them together. Online parts manual for the 01 /
02 Bandit 1200 http://www.eisenbach.com/ae/parts.php
![]()
Microfiche
You
can obtain the Suzuki microfiches from any authorized Suzuki dealer
for ~$10US. The microfiche contains pretty much every part
number for every piece of the Bandit down to the very last bolt.
Keep in mind that you will also need a microfiche reader which will
run you about $250US new. One list member recommends buying
from Grainger. If you want to save your money and don't mind a
bit of inconvenience, most public libraries offer microfiche readers
and will print pages for a small fee.
Fuel
Use
only unleaded gasoline of at least 87 octane (R+M)/2 method or 91
octane by research method. Europe uses the RON method.
See this
link
for more info. Buying a higher octane gasoline than what is
recommended for your engine does you no good. Unless you have higher
compression than stock or a "pinging" or "knocking"
problem, don't bother spending the extra money for premium fuel. See
this
link
for more info.
Fuel
Additives
Only two fuel additives have been recommended for
use by list members. Both are designed to clean carburetors and
remove buildup and varnish.
STP Super Concentrate - This is a gold-colored liquid in a clear bottle. Recommended by Dale Walker.
Chevron Techron - This is found in a black bottle. It is recommended that you add 1/3 to 1/2 bottle per tankful of gas. Good results have been had by adding a splash of Marvel Mystery Oil to the mix. This apparently helps to lubricate the moving parts inside the carburetors.
Engine
Oil
This is almost a taboo subject because of different
people's views on oil. Suzuki recommends SAE 10W/40 oil.
As long as you change the oil every 3000-4000 miles (more if your
bike is subjected to rough conditions or lots of start and stop
riding) you should be fine. Be careful not to use synthetic
oils, "energy conserving" oils, or additives with "friction
modifiers" unless they are specifically designed for use in a
motorcycle. Bandits, like most other bikes, use a wet clutch
which is submerged in oil. Friction modifiers can cause the
clutch to slip, especially if your bike has increased horsepower over
stock. This is not a big problem on the 400 or 600cc models but
happens often on the 1200. Note that Suzuki only recommends
changing the engine oil filter after every *other* oil change (every
8000 mi). Whether or not you change the filter each time or
every other time seems to be personal preference.
Mobil Delvac 1300 Super 15w40
Chevron Delo 400 Heavy Duty 15w40
Shell
Rotella T Heavy Duty 15w40
These
oils are non-synthetic conventional oil available in both 10W-30 and
15W-40 grades that meets SJ, SH, CH4 and Allison C4 specs. It's
marketed as a commercial grade oil, but also meets the latest
automotive spec (SJ). Since it's a 15W-40 oil, it isn't limited in
the amount of zinc compounds like the thinner automotive SJ oils. It
actually has more zinc dithiophosphate than some motorcycle oils and
a lot of the old SG oils. It has 1.69% zinc dithiophosphate, while
Mobil 1 MT4 for motorcycles only has 1.08%. Because it's
formulated for heavy-duty applications, it can usually be found by
the gallon at truck stops and auto parts stores.
~$5-10US/gallon.
Good reading on oil for your Bikes> (click
here)
Oil Analysis
Detect
Auto Labs, Inc.
Least expensive ($5-$10); sometimes found in
large auto super stores; does not list previous samples; always
suggest that you change the oil, regardless of condition.
Lubricant
Consultants, Inc.
Around $10/test,
sample kit a few bucks more; provides a history of tests; good for
looking at trends.
Cleveland
Technical Center
Provide history of tests and contact you by
telephone if they discover a problem; $6 for a sample kit (3
samples), $8 for the actual test. You can buy the kits directly.
Results from all three labs are reported to be reasonably close for
the same sample.
Brake/Clutch
Fluid
Suzuki recommends only DOT4 brake fluid for the brake
and clutch reservoirs. You should not mix or substitute other
types of brake fluid (ie: Dot3 or Dot5). Suzuki recommends
changing clutch and brake fluid every 2 years but wet climates may
require more frequent changes to prevent corrosion.
Oil
Fram
#PH6018 (Not a very good filter quality)
Per-Form #J-509
(Available through Holeshot)
STP #MO-18 Same quality as OEM Auto
Stores Stock them
The
original Suzuki filter can be had at a discount through Ron Ayers
Motorsports
Your local Artic Cat dealer should also carry the
correct filter as their snowmobiles use the Suzuki engine.
Air Filters
individual
elements RC1824 chrome ends 4pak
RU1820 plain ends 1pak
RU1824
plain ends 4pak
dual elements RU2920 plain ends 1pak
RU2922
plain ends 2pakK&N Replacement for stock: #SU-7593
K&N
Oval (Stage 2) filter: #RC-1824
UniFilter replacement for stock:
#NU-2472
Bandit
1200
Cold: NGK JR10B
Stock: NGK JR9B
Hot: NGK JR8B
Autolite Stock # 4143
Champion Stock # 905 RA4HC
Bandit
600 (dual electrode)
Cold: NGK JR10C
Stock: NGK JR9C
Hot:
NGK JR10C
The spark plug gap should be 0.6-0.7mm (0.024-0.028in) for both models.
Dual
electrode plugs do not really enhance performance but offer longer
life than single electrode plugs. The JRxC plugs can be used on
the Bandit 1200 without problem.
Another option is Autolite #4143
spark plugs which fit exactly the same and are
usually cheaper
than NGK's.
Valve
Cover Removal
See the Valve
Cover Removal document
Vavle
Adjustment
This procedure is fairly well documented in the
Haynes and Suzuki manuals. One tip though, you don't need to take the
ignition cover off the engine to turn the engine. Just put it on the
centerstand in 5th gear, and turn the engine by turning the rear
wheel.
See the Valve
Adjustment Q&A
and Fast
Larry's page
for more info.
Faulty
O-ring/Head Gasket
Most of the time leaky head gaskets are due
to a faulty or improperly installed O-ring (see service bulletin
below). This can happen - even if the service bulletin doesn't
apply to you - during routine valve maintainence or straight from the
factory. Because the Bandit's spark plugs are deeply recessed
into the head, the plug holes could fill up with water during bad
weather. To combat this Suzuki drilled drain holes to allow water to
escape from the plug recesses and these come out at the front of the
engine just below the exhaust ports. The plug recesses are sealed
from the inside of the valve cover with O-rings. Occasionally
you will find oil escaping from one or other of the drain holes
beneath the exhaust ports. This is usually due to one of the O-rings
failing and allowing oil from inside the valve cover to find its way
into the plug recesses. Its very easy to nip one of these or to have
it seat not-quite-right if you've had the valve cover off.
Service
Bulletin
Bulletin no. GSF/GSX/GSX-R - 103 Date 11/20/98
The service bulletin is for 1996 GSF600ST through 1998 GSF600SW starting with frame #W2100634, all GSF600SX Bandits, all GSF1200SX Bandits 1997 GSF1200SAV & 1997 GSF1200SV through 1998 GSF1200SW. The service is the Valve cover union bolt and washer. This is the 4 bolts with the oil passage in them and the metal washer at the valve cover. The old part numbers are 11181-27E00 union bolt, 09168-08008 washer the new part numbers are 11181-27E00 union bolt, 09168-08029 washer OR the new set part number is 11180-27820 (one bolt and washer in each set, total of 4 needed). There is also a new torque spec for that bolt 14.5 lb-ft or 20Nm, 2.0kgf.m The diameter of the flange portion of the bolt and the sealing washer has been increased to provide better sealing, as well as the increase in torque specification. Bring your bike to your local dealer for more info and ordering of new parts.
Many Bandit owners replace their intake and/or exhaust cams with those from the GSX-R. This results in higher horsepower and more top end for the bike. Cams from the 1986-1989 GSX-R 1100, also the 88 to 93 Katana 1100 fit the Bandit 1200 engine. These cams are designed for the Bandit-type head. 1990 and later model GSX-R cams will not work as they are designed for the shim-under-bucket type valve adjustment and have one lobe per valve instead of shared lobes like the Bandit.
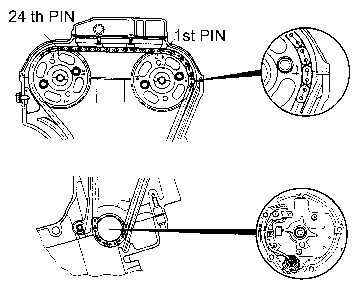
Cam Marks
There are several big bore kits available for both the B-6 and B-12. Most of the Bandit 600 kits are not recommended by list members as they are quite expensive and require complete tear-down of the engine for re-sleeving. Most tuners agree that money would be better spent on a 750 or 1100 GSX-R engine swap. This will give you a huge boost in horsepower without requiring major surgery to the engine. Either of the bigger GSX-R engines should be a direct fit in the Bandit chassis. Dale Walker is currently developing a 72mm kit which would up the 600cc Bandit to 792cc. Pricing and specifics not yet available.
Holeshot sells a bore kit for the Bandit 1200. There is a stock bore kit, 1157 cc and has a compression ratio of 11 to 1, also a 1216cc kit, a real torque monster. This kit is available for ~$560-600US directly from Dale Walker's Holeshot. Many list members have used his kits with great success.
Click here to read the Ignition Advancer Install document
The Bandit 1200 has a very large engine - both in physical size and in displacement. Because of this it tends to transmit a lot of vibration. There are many things that owners can do to help reduce how much of this vibration is felt by the rider.
Vibration Dampers - RTB Accessories makes a bar-end weight called "Buzzfree" that is 3 to 8 times heavier than standard weights. This is said to reduce vibration significantly. There is an accessory called the "Bar Snake" which is also said to reduce vibration greatly. A cheaper (though, less effective) solution is filling your handlebars with an expanding foam like "Great Stuff". This is available at most hardware stores for a few dollars.
Synch the carbs - If your carburetors are out of sync the engine will vibrate more and can have a "lope" at idle. Synching the carbs will also improve drivability and fuel mileage.
Install aluminum handlebars - Aluminum bars tend to transmit much less vibration to the hands than the original steel ones in addition to being lighter.
Tighten motor mounts - Make sure the bolts on your motor mounts are snug. Some list members have reported loose mounts from the factory. Also take the time to ensure that the rubber in your mounts is not too hard. This can lead to excess vibration.
Throttle lock - Installing a throttle lock makes it possible for you to keep a looser grip on the bars and can make long trips more tolerable.
Gel gloves/grips - Olympia makes a pair of standard weight leather gloves with gel in the palms. One list member reports good results with these. Several companies make foam grips (Grab-On) or grips with some sort of gel in them. No reports available.
Keep RPM's higher - Inline four cylinder engines are notorious for their low RPM shake. Keeping the revolutions up helps counteract this.
Change your seating position - Try to put less weight on your wrists. This may involve simply correcting your posture or may require aftermarket seat/bars.
Case
Covers
These parts seem to always get cracked or ground
through is you should happen to wreck your bike. If you don't
have the recommended case guards (see below), and end up needing to
replace your case covers, check the junkyard first. Remember
that the Bandit shares many components with the GSXR - including
engine case covers. The Bandit 600 shares parts with the early
GSXR 750's, and all Katana 600's and 750's. Take your broken
parts along with you just to make sure the replacement pieces are an
exact match. If you cannot find a match at your local junkyard,
a few companies offer aftermarket pieces, many of which are more
robust than the stockers. Keep in mind that you will be paying
a premium price, however.
Case
Guards
Case guards are designed to protect your engine in case
of a wreck. They cover the lower portion of the case and
sacrifice themselves in the event of an accident. Many
different case guards are offered for the Bandit. See links
below for more information.
Suzuki Case Guards -
Part#99950-70068
Givi Case Guards
RennTech
Case Guards
- Available from MPS
and Bandit
Mania
Suzuki
Case Guards
Suzuki manufactures case guards specifically for
use with the Bandit. They are available directly through any
authorized Suzuki dealer.
Part# 99950-70068
Givi
Case Guards
Givi also makes a set of case guards for the
Bandit. These are shaped slightly differently from the Suzuki
guards and attach to different points of the frame.
Sprocket
Cover Leaks
First, check to make sure this isn't just chain
lube. Sometimes chain lube flings onto the inside of the
sprocket cover, then drips down once the engine heats up. If it
definitely *is* a leak, you'll have to replace some seals.
There is a seal behind the clutch cover and a 1/4" push rod.
If the seal is leaking, the rod may be worn out too. The seals are
cheap through Bonzai or Ron Ayers Motorsports. You may want to
replace the shift shaft and output shaft seal at the same time.
The seals are easy to remove, using a self-tapping sheetrock screw.
Just get the screw started (don't let it go past the seal, one on
either side of the seal) and pull it gently out with pliers. Use a
piece of wood, or better yet a PVC water pipe coupling to tap the new
seals in. You may want to put some ATV sealant on the outside of the
seal. Total time for this project should be 1 to 2 hours,
depending on how familiar you are with your bike.
Crankcase
Vent Line
Crankcase vent line is made from 1/2" tubing.
The Bandit 1200 and 600 share the same airbox. Because of this, the 1200 model doesn't always get as much air as it would like, especially if fitted with an aftermarket exhaust canister. Freeing up the engine's intake system helps but aggravates lean-from-the-factory carb jetting. There are several fixes for this problem including:
Removing
the "Snorkel"
The Bandit airbox is fitted with a
"snorkel" (2"x3" rubber tube) from the factory.
This is basically for noise control. Most owners recommend the
removal of this piece. This allows the engine to breathe more
freely and better utilizes the air cleaner (instead of concentrating
airflow on one small portion of it), though it also increases the
sound level of air going into the engine. If you don't mind a
little bit of additional noise, this is a highly recommended (and
free!) modification which generally does not require rejetting.
K&N
Air Filter
Many Bandit owners choose to put a K&N filter
on their bikes. There are trade-offs for everything and this is
no exception. While the K&N filter is reusable and offers
increased airflow for about the same price as a stock replacement, it
also allows more dust particles to enter the engine. The Motor
Industry Research Association found that K&N filters stop 97% of
particles on an SAE fine dust test (0-20 micron particles). By
comparison, the average paper filter stops 98-99% of particles on the
same test. This means that the K&N passes 2 to 3 times as
many particles as a standard paper filter. It is up to each
individual owner to determine which filter is best for them, K&N
or stock. While the K&N allows more dirt particles to pass
through the filter to the engine, the decreased long-term cost and
increased power often outweigh this drawback.
K&N Replacement
for stock: #SU-7593
K&N Oval (Stage 2) filter: #RC-1824
Clutch
Springs
The Bandit 1200 has a fairly weak clutch for such a
brute of an engine. Because of this, the clutch can begin to
slip after using synthetic oil or increasing stock
horsepower/torque. To help counteract these effects, many
owners recommend installing one Barnett clutch spring in replacement
of one of the stockers. This will give you a stronger clutch at
the expense of a bit of increased lever pull. Replacing *all*
stock clutch springs with Barnett springs is not recommended since
the clutch will be much more difficult to pull. Since the B-12
uses symmetrical diaphragm-style springs, there's no problem with
replacing only one spring. For more information read the
Barnett
Clutch Install
document.
![]() Barnett
Diaphragm part number MT-94
Barnett
Diaphragm part number MT-94

The Bandit 600 actually comes with a very strong stock clutch. Because of the stronger clutch and lower horsepower/torque (in comparison to the 1200), it rarely needs any modification.
Replacement
Parts
The clutch assembly from 1989-1992 GSX-R 1100's is
reported to fit the Bandit 1200, as will the assembly from the 88
Katana 1100. The 1986-1988 GSX-R 1100 clutch will not work as
they use a different number of teeth on the back basket. The clutch
spindle nut is a 30mm and the countersproket spindle nut is 32mm.
Make sure you've got these size sockets before beginning any work.
This
is an easy drop-in mod, and uses all OEM parts; cost for
everything
is just over $400 from Ron Ayers.
You need:
1x 92 GSXR 1100
clutch outer basket
(part # 21200-40821),
1x 92 Katana 1100
inner hub
(part# 21410-06B03),
1x 92 Katana outer pressure
disc
(part# 21462-06B00),
1x set, GSXR steel and fiber clutch
plates
(part# 21400-40C01),
1x extra fiber plate
(part#
21442-48B00),
4x springs
(part# 09440-20018),
4x bolts
(part# 09116-06171),
4x spacer/bushing
(part
#09180-06174),
3x of a 1" ID flatwasher from hardware
store... you need these to
correct the basket-to-nut spacing,
1x
of a 7/16" ball bearing to correct pushrod length.
Remove the
drive gear from the back of the OEM basket and re-install
it on
the new part.
If you'd rather stay with the diaphragm-style
springs (Anders liked the
action better for his application) there
is also a GSXR pressure plate
you can run instead of the Kat outer
plate... sorry, don't have part
number(s) for that item.
Fuel
Line
Fuel Line is made of 5/16" tubing. When
replacing, make sure to *ONLY* use fuel line as other tubing may rot
or disintegrate from the gasoline.
Carburetor
Specifications
US, European, Canadian, and Australian 1200cc
models:
California models in parenthesis
Carb
type: Mikuni BST36SS
Main Jet: 102.5
Jet Needle: 5D76-4th
(5D80 - CA)
Needle Jet: O-8 (0-8M - CA)
Throttle
Valve: #120
Pilot Jet: #37.5
Pilot Screw: PRESET (1-3/4
turns)
Ignition timing: 7 deg BTDC at 1500rpm
(Carb
#4 has a Throttle Position Sensor that is connected to
Ignition
Module.)
Other
bikes that use BST36SS carbs:
1988-1997 GSX750F Katana
GSX-R1100
(unknown years)
1992 GSX1100G (possibly other years as well)
The
2-inch Mod
This is a modification to the stock airbox where
you basically cut a 2" hole to allow more air to flow to the
engine. This generally requires re-jetting or shimming of the
carburetors. You can purchase shims from Radio Shack, part
# 64-3022A .You should also read
Moonray's Wrenching
for Idiots if
you're not sure about modifying the stock airbox. This is
recommended for the 1200 model only. Doing the 2-inch mod to
the 400 or 600 model has no effect. The stock airbox (without
the snorkel) can flow more air than the engine would ever possibly
use. Check this link for information about the flow rate of the
stock
airbox versus the 2" hole
modification.
Holeshot
Stage 1 or Stage 2 kit
These are kits designed specifically
for the Bandit 1200 and tested by Dale (and many list members) to
work, and work well. Stage 1 replaces the stock air filter with
a K&N unit while Stage 2 replaces the stock airbox/filter with
twin K&N oval filters. Both kits include the required
needles and jets and, of course, Dale's wisdom and experience.
Read Pete Solomon's Stage
2/Vortex document
if you're thinking about the Stage 2 kit.
Stage
1 kit
(for stock air box): Part #B12-JK1
Stage
1 kit
(for modified 2" airbox): Part #B12-JK1-M
Stage
2 kit:
Part #B12-JK2
Radio Shack Shim Part # 64-3022A
Rejetting
the Bandit 600
The 600 is even easier than the 1200 to shim
the needles. The Keihin carbs on the B-6 do not have the dreaded
o-rings like the B-12's Mikunis, so not to worry. This
procedure will probably take less than an hour total. Just pull
the tank and remove the throttle cover of each carb, shim each of the
needles 0.05", and reassemble. This will smooth out the
midrange and make the bike run better with an aftermarket pipe.
Carburetor
settings
Obviously, these settings won't work perfectly for
everyone. However; most Bandits work very well with these
settings. Note that you may have to adjust for temperature
and/or altitude and how you ride. These settings should give
gas mileage similar to stock but with increased rideability and
horsepower. Note that even though the "Stage 2" uses
much larger mains than the "Stage 1", mileage will only be
affected at or near full throttle. The settings listed below
are for average temperature (40-80 degrees Fahrenheit) and sea level
to +~1000ft. These figures are for US models only. Europe
gasoline is different and thus, needs slightly different carburetor
settings.
Bandit 1200 96 - 2000
|
|
Main Jet Size |
Pilot Jet Size |
Needle Shim |
Idle Screws |
Float Height |
|
|
Stage 0 (completely stock or aftermarket exhaust only) |
102.5 Stock |
37.5 (stock) |
0.04-0.05" |
2 to 3 turns out |
14.7mm |
|
|
Stage 1 (K&N filter, 2" mod, aftermarket exhaust) |
127.5 |
35 |
0.04-0.05" or Holeshot needles 2/3 notches from full-rich |
2.5 to 3.25 turns out |
14.7mm |
|
|
Stage 2 (Dual K&N ovals, no airbox, aftermarket exhaust) |
150 |
32.5 |
0.04-0.05" or Holeshot needles 2/3 notches from full-rich |
2.75 to 3.5 turns out |
14.7mm |
|
|
|
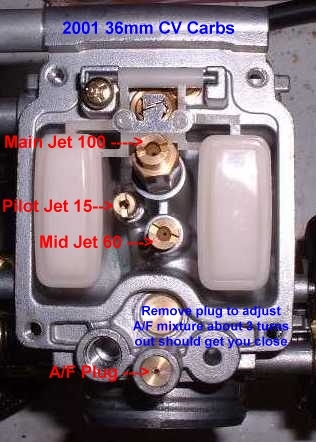
||||||
|
Main Jet Size |
Pilot Jet |
Mid Jet |
Needle Shim |
A/F Mixture Screws |
Float Height |
|
|
Stock |
100's |
15's |
60's |
Stock |
2.5 to 3.0 |
13.0mm |
|
Stage1 Slipon Exh. |
110's |
15's |
60's |
.020 |
2.5 to 3.0 |
13.0mm |
|
Stage2 Dual K&N Jet Kit Full Exhaust |
155's to 160's |
15's |
60's |
.020 to .030 |
3.0 |
13.0mm |
Bandit 600
|
|
Main Jet Size |
Pilot Jet Size |
Needle Shim |
Idle Screws |
Float Height |
|
Stage 0 (completely stock) |
|
|
|
|
|
|
Stage 1 (K&N filter, aftermarket exhaust) |
100 |
Stock |
0.05" |
2 turns out |
Stock |
Pilot/Main
Part Numbers
Mikuni Pilots: BS30/96-XX where XX is the
size you need (ex: BS30/96-35)
VERY IMPORTANT: Some pilots have
crossdrilled holes in them. Pilots with no crossdrilling or 6 holes
are okay. Do NOT use pilots with 8 crossdrilled holes in them!
Mikuni
Mains: 100/604 (+size, from 60-200 in increments of 2.5)
Washers
for shimming needles can be found at Radio Shack or hobby
stores. Most owners suggest getting your washers from a hobby
store as they are more likely to be of uniform size and less likely
to be "pressed" washers which tend to be bent or curved.
Use a micrometer to measure the washers thickness to ensure uniform
fit.
Mains and pilots are available from many sources including Carburetor Parts Warehouse, Ron Ayers Motorsports, Dennis Kirk, and most local bike shops. Obviously, Holeshot needles can only be obtained through Holeshot and normally, only as part of a kit.
Carburetor
Tuning
Here's a helpful article
on setting CV (constant velocity) carbs
like the Bandit's
B-12
Carb Screw Sizes
It is highly recommended that you change out
the Phillips screws fitted by Suzuki with Allen head screws.
This can be done when you pull the carbs for jetting work and will
make future modifications much easier. These screws can
generally be found locally but can also be ordered Metric Screw and
Tool.
5mm
x .8mm x 12mm - Float Bowl
5mm x .8mm x 16mm - Diaphragm Caps
4mm
x .7mm x 24mm - Hose Clamps
Fuel Valve
The Bandit is
fitted with an automatic, diaphragm-type fuel valve with three
positions: ON, PRI, and RES. ON is the normal position which
allows fuel to flow to the carburetor if the engine is being started
or running. This is the setting that the valve should be left
on most of the time. The RES or Reserve position in intended
for use if the fuel level in the tank gets low enough that the engine
will no longer run in the ON position. As with the ON position,
no fuel will flow unless the engine is starting or running. The
PRI (Priming) setting should only be used if the motorcycle has been
drained of fuel or if it has sat for sufficient time to evaporate the
gasoline from the float bowls. The PRI setting allows fuel to
flow from the tank to the carburetors whether or not the engine is
running. You should never leave the fuel valve in the PRI
position. It may allow gasoline to run into the carburetors
(past the float bowls) and into the engine which could result in
engine damage or a fire.
For those of you that need more fuel for aftermarket carbs, such as Mikuni Flat Slides, This mod is for you. I recently installed this setup on my 01 B12 and it's easy and works great. The only mod you have to make, is take a rat tail file and clean up the center of the hole for the petcock screen to inter the tank, it takes about 1 minute to open up a bit to clear it. This will not stop you from re-installing the OEM petcock. Listed below are the 2 pingel parts you will need. This will give you more top end fuel flow and possibley 2 to 3 mph more trap speed. You will also need about 3' of 5/16 fuel line, this will give you a little extra. The valve has on/off position only, no reserve setting.
Pingel 3211-D-AH Valve 3/8 NPT Dual Hex V3
Pingel A1602C Adapter Plate 3/8 1.338/34mm V3
Carb
Synchronizing
(Balancing)
This is pretty straightforward; you basically just
follow the manual and the instructions that come with your synch
tool. A big floor fan blowing on the oil cooler helps keep the engine
temp down while you're working.
Synchronizing
Tools/Gauges
Mercury tools are inexpensive and never need
adjustment, but mercury is poisonous and environmentally hazardous.
If you're not careful the mercury can get sucked into the engine. It
won't hurt the engine, and the instructions that come with the tool
should explain how to purge it. Dial gauges don't contain
mercury, but good ones are expensive. See the Tools
section
for more info.
Air/Fuel
Ratios
Carburetors can only be tuned for maximum power or
mileage at a given RPM. 14.5-14.7 air fuel is maximum fuel
mileage. 13.2 air fuel (richer than 14.7) is maximum steady state rpm
power. 12.7-12.9 is maximum acceleration power. If you set the carbs
for maximum power in the mid range and top end it is not going to get
fuel mileage. Lowering the needle and adjusting the idle circuit will
help. If you set the idle circuit lean, and lower the needles
to 14.7 air fuel ratio then adjust your top end to 13.2, your bike
while riding in the mid range/lower RPM's will get mileage. on full
acceleration at high rpm you bike will have power. But if you set the
carbs this way you will not have maximum mid range power. Also, one
full clip movement may be more than what is needed to go from lean to
perfect 14.7 air fuel ratio.
Temperature/Elevation
Effect on Air/Fuel Ratio
Changes in ambient temperature and
altitude affect richness of your air/fuel ratio. This is
because air gets more dense as it gets colder. Air is also
denser the closer you get to sea level. Therefore; more fuel is
needed to maintain proper air/fuel ratio in cold weather or near sea
level than is needed in hot weather or at high altitude. If you
set your carburetors for perfect air/fuel ratio in San Francisco on a
50 degree day, your bike will be chokingly rich in Denver on a 90
degree day. Obviously, you will be best served by jetting your
engine to run best at the average temperature and elevation you will
normally ride. Mikuni suggests an increase of one full jet size
for every 25 degree drop in temperature.
Carb
Heaters
Suzuki offers a carb heater kit which is often fitted
as stock in the UK. This kit helps the bike to start in cold
weather and prevents icing when riding in cold, wet weather.
The heater plugs screw vertically up into the the bottom of the float
bowls. It is powered directly from the battery and is generally
connected through a switch so that it can be turned on a few minutes
before start-up. Keep in mind that even though it helps with
cold weather starting, this kit only warms the carbs. It does
nothing to prevent thickening of the crankcase oil or freezing of the
battery in extremely cold weather.
Canada/Europe
Motor Mounts
Canadian and European spec bikes have additional
motor mounts fitted from the engine to the bottom of the frame.
These are available through Canadian Suzuki dealers (you *may* be
able to get these in the US as well). While not absolutely
necessary, they are recommended if your bike produces more than 110
horsepower. Some list members say that these OEM mounts
decrease vibration.
Brackets #41931-27E50 (2)
Bolts
#01550-10753 (2)
Nuts #09159-10020 (2)
Bushings #41932-27E50
(2)
Bolts #07120-08253 (4)
Holeshot
Motor Mounts
Holeshot also sells a set of motor mounts that
are very similar to the above OEM items and are mounted in the same
place. The Holeshot models are made of aluminum while the
Suzuki models are made of rubber mounted steel. Also, the
Holeshot mounts are NOT rubber mounted.
Covering
Allen Bolts
You can use the same plastic plugs that cover the
passenger grab handle Allen bolts to cover other bolts on the
Bandit. For a cleaner look, try covering the Allen bolts that
go through both front frame down tubes to the engine brackets.
The part numbers for the covers are as follows:
#09250-06004
The Bandit has a reputation for having a very soft suspension. Unless you're a light rider, it may feel vague or sloppy in corners or when pushing the bike hard. Both the front and rear can be fixed though. However; this does require a bit of time and wrenching. There is generally not enough adjustment in the stock components to satisfy the demanding rider. If you *do* decide to upgrade your suspension, make sure to get components designed for your weight (and any additional weight you might have added like a full-time passenger or luggage). Most springs are available in different stiffness levels and should be ordered to tailor to your particular bike.
The front end of most Bandit models suffers from springs that are too soft and poorly damped shocks. This can cause "pogo-ing" of the front end and severe dive under braking. Many list members recommend the Race Tech Gold Valve kit to help alleviate these problems. This can also be cured (to a lesser degree, but much more cheaply) by using Progressive springs, Race Tech springs (without the Gold Valves), and/or thicker viscosity fork oil - though the latter is not the recommended cure. Suzuki ships the Bandit from the factory with #10 fork oil.
Read
about the Race Tech Gold Vaves here.
Read
about Progressive Fork Spring installation here.
Fork
Brace Bolts
The bolts that hold in the front fork brace and
front fender are notorious for vibrating loose. We *highly*
recommend you check these bolts for tightness at regular intervals
and suggest using blue Locktite to prevent them from loosening.
Replacement Forks
Suzuki
RF-900 Forks
The Bandit is believed to share front forks with
the Suzuki RF-900. It also shares the fender and fender brace
as well. People looking for replacement pieces for their front
forks should check the salvage yards for an RF-900 donor bike.
If you need to do a total fork replacement, you would be better
served by using GSX-R forks instead as they are higher quality,
upside-down, and fully adjustable.
Suzuki
GSX-R Forks
After bending or breaking the forks on the stock
Bandit, some people have chosen to replace them with an upside-down
GSX-R unit. This is not a simple installation and requires a
fair amount of work, but it can be done. The main advantages to
using the Gixxer fork are the additional adjustability and amount of
aftermarket parts available for this suspension. Hopefully
we'll have directions on how to do this modification in the future.
The Bandit's rear suspension is best fixed by replacing the stock shock with an aftermarket unit or fully adjustable GSX-R 750/1100 shock. Aftermarket shocks are a somewhat easier installation and are generally covered by warrantee, however; the GSX-R install is much less expensive.
Koni
Koni
offers a replacement rear shock for the B-6. One list member
reports a much better and more planted ride with the Koni than with
the stocker. It uses a progressively wound rear spring and has
both compression and rebound damping adjustments. Interested
parties should be aware that the supplied spring tension adjuster
tool that comes with the shock is very poorly made and has been known
to break on the first use. This unit retails for ~$320US but
can be found for under $250 through RD Enterprises.
Koni part#
2615-1018
Progressive
420
This
replacement shock is available through Holeshot. It has been
used my a few list members and comes highly recommended. As
with most other aftermarket shocks, this one is fully rebuildable and
offers preload and rebound damping adjustment. Available for
both the Bandit 600 and 1200.
GSX-R
Replacement
Many Bandit owners swap their stock rear shock for
a Suzuki GSX-R unit. This has many advantages over the stock
unit including being rebuildable and offering much more
adjustability. The biggest advantage would most likely be
cost. A used GSX-R shock can be had for $100-200 while the
aftermarket Fox, Koni, Progressive, etc. can cost several times that
amount. 1991-94 GSX-R750 shocks are recommended as they feature
a remote reservoir while the earlier model shocks do not.
1989-1998 GSX-R1100 shocks *should* fit as well (No one has yet tried
the 89 or 90 models). Note that the GSX-R shock is much more
stiff than the stock Bandit shock, especially if you use the shock
from an 1100. Most members recommend the 750 shock for the B-6
and B-12. The 1100 shock is recommended for larger B-12 riders
and those who often haul luggage/pillion. Note that both shocks
raise rear ride height 1-1.5". This tends to quicken the
steering of the bike and may require headlight adjustment.
The
GSX-R shock transplant document is currently unavailable.
Lowering
Struts
Sometimes
drag racers and shorter riders find it valuable to lower the Bandit's
rear suspension. Fast Larry offers lowering struts for the
Bandit on his web page.
Extended
Swingarms
Several companies make extended swingarms and
swingarm extensions for the Bandit. Extending the rear swingarm is
generally good for about 0.2 seconds in the 1/4 mile.
Holeshot
Swing Arm Extensions
~$580US
directly from Holeshot
Spaceport
Cycles Swingarm Extensions
~$300
from Spaceport Cycles
Replacement wheels are generally available through the local junk yard (breakers). The Bandit 1200 rear rim is the same as the 1994-95 GSX-R750 rear rim. The part numbers for both wheels match exactly with the first 10 digits being identical and the last three designating paint color. We do not have any information yet on replacements for the front rim or Bandit 600 rims but some have suggested checking the part numbers on the RF600 and RF900 bikes for a possible match.
General
Info
The Bandit 1200 comes with 15 tooth front, 45 tooth rear
sprockets and a 110 link chain. The 1200 ABS model is
equipped with a 114 link chain and the Bandit 600 uses a 112 link
chain. Most list members recommend a 10,000-10,500lb chain for the
Bandit 1200.
Cleaning
You
should use either kerosene or WD-40 to clean your chain. Both
are safe to use on the O-Rings and will remove grit and grime quite
well. A stiff bristle brush or old toothbrush can help work
wonders on a dirty chain. Do not use commercial cleaning
products or high pressure water car washes on your chain. These
products contain chemicals that can break down the O-rings in the
chain and cause premature wear.
Lubrication
There
are basically three options here: Scottoiler,
chain wax, and "other". Chain wax is a love it or
hate it product which tends to fling off less than most oils but
which also is more "sticky" on the chain. Most list
members recommend Bel Ray, Torco, or other synthetic lubricant and
prefer not to use chain wax. In a pinch you can even use motor
oil or gear oil. The main thing is to just keep the chain clean
and lubricated. If you want to skip the hassle and headache of
constantly lubricating your chain, consider a Scottoiler. These
devices install on your bike and automatically lubricate the chain.
They are fairly pricey but help prevent chain wear by keeping the
chain constantly lubricated. Also, they are worth the cost to
those who take a lot of long rides or who just hate worrying about
chain lubrication. Click here for an article on mounting
the Scottoiler on a Bandit.
Here's
another article. This one's a little more detailed with better
pictures.
Master
Link vs. Riveted
Most list members feel that master link
chains are adequate but some riders swear by rivet-only chains.
The choice is up to you. If you're worried about your master
link failing, use a riveted chain. Just keep in mind that many
bikes with 200+HP use master link chains with no problems. If
you so use a master link chain, most list members recommend putting a
dab of silicone or JB Weld epoxy on the link to prevent it from
coming off. If you simply must use a riveted chain, temporarily
put on a master link and ride to your nearest dealer to have the
chain riveted. This is generally much cheaper than purchasing
the proper tools unless you go through a lot of chains.
Chain
Replacement
When your chain begins to bind or kink, it's time
to replace it. You may also notice tight spots when rotating
the back tire (on the center stand in neutral). There is also a
method to check the chain outlined in the users manual. There
are many good brands of replacement chains on the market. Most
list members recommend the DID X-Ring chain. It is strong and
long-lasting and comes in a shade of gold that matches the stock
brakes and stickers. Make sure to purchase the correct length
chain when replacing, especially if you have changed sprocket sizes.
Sprocket
Replacement
You can effectively change your overall gearing by
changing to sprockets with fewer/more teeth. Raising or
lowering the front sprocket by one tooth is about the same as
changing the rear sprocket by three teeth. It is recommended
that you leave the front sprocket at 15 teeth as 14 teeth tends to be
too low and is hard on the chain, and a 16 tooth sprocket will not
fit without some grinding work (though it can be done). The
front sprocket of the B-12 is held on by a 32mm nut and the rear uses
a 24mm nut. You'll need these sockets to replace your sprockets
so be prepared with the proper tools before starting. A change
of one tooth on the rear sprocket is equal to about a 100RPM change.
Also, keep in mind that replacing your sprockets may require a longer
or shorter chain than the stock length.
Lowering Gearing:
Most Bandit owners who change the gearing from stock do so to gear
the bike lower. You can lower the gearing of your bike by
either increasing the number of teeth on the rear sprocket or
decreasing the number of teeth on the front sprocket. The
advantages of lower gearing are more torque and quicker acceleration
at the expense of fuel mileage and top speed. A stock or
lightly modified Bandit 1200 will not pull clear to redline in 5th
gear anyway so top speed should not be a concern to most riders.
15F/47R seems to be a good compromise for most owners. This
increases acceleration and torque while not raising cruising RPM by
too large a margin. Gearing lower is most useful if you have
raised the HP/Torque curve of your bike (for example: installing
GSX-R cams) or if you're in need of more power immediately off the
line, such as for drag racing.
Raising Gearing: If you
decrease the number of teeth on the rear sprocket or increase the
teeth on the front, the bike will be geared higher and run at a lower
rpm than stock at a given speed. The advantages of higher
gearing are generally more fuel mileage and top speed at the expense
of acceleration and perceived power. It is not advised to gear
the Bandit 1200 any higher than stock. The B-12 is geared
fairly high from the factory and only turns ~4000RPM@70mph with a top
speed of around 145mph. Most stock and mildly modified bikes
can't even pull to redline in 5th gear because of the high gearing.
Gearing the Bandit higher is recommended only for those who take long
trips and value fuel mileage over power and general drivability.
Tire sizes are indicated by number/letter combinations such as 140/90-H16, meaning 140 mm wide, 90% as high as it is wide, and fits a 16" rim. The letter is the rating according to highest continuous speed (see "Speed Ratings" below).
Tires also have a pressure rating molded into the sidewall. This is the MAXIMUM tire pressure, not the recommended pressure. The recommended pressure will be given in the owner's manual and will also be on a decal on the swing arm. The recommended pressure is a guideline based on an average load and riding style. Heavier loads, spirited riding, or different tires may require a slightly higher than recommended pressure. Using less than the recommended pressure is not advised since this could lead to excessive heat buildup - due to increased flexing - and possible tire failure.
Age
You
can tell the age of your tires by checking the date code on the
sidewall. The date code will be a 6-digit combo (three letters
followed by three numbers). The date can be read as follows
(disregard the letters):
VKD347 = 34th week of 1997
DEB408
= 40th week of 1998
Balance
For
tires to be properly balanced, the "tire balance mark"
should line up with the valve stem. The "tire balance
mark" is usually signified by a colored spot or circle on the
sidewall of the tire. This shows the lightest part of the
tire. Aligning it with the valve stem helps offset some of the
valve stem's weight. This helps to reduce the number of
counter-weights required to balance the wheel. A good balancing
job should require no more than 50gm of weights and the weights
should be placed near the valve stem. Much more than this
indicates that the tire is lopsided or was mounted poorly.
Speed
Rating
Sustained speed rating is designated by a letter
code:
N 93 mph (150 km/h)
S 112 mph (180 km/h)
H
130 mph (210 km/h)
V 149 mph (240 km/h)
Z 149+ mph
(240+ km/h)
Sizes
Stock
tires are as follows:
Bandit 1200 - F:120/70ZR17
R:180/55ZR17 Bridgestone BT-54
Bandit 600
- F: 110/70H-17 R: 150/70H-17
Bridgestone Excedra (bias-ply)
(Many brands do not come sized for
the B-6 rear. Owners report that 160/60-17's work fine)
For
more information about tires to fit the Bandit 1200 see this
article.
For
more information about tires to fit the Bandit 600 see this
article.
Brands/Models
Many
tires have been tried on the Bandit and are mostly a matter of
personal preference. Here is a short list of the most popular
tires for the Bandit. These tires are suggested by list members
for use on the B-12 but will probably work just as well on the B-6.
Because there is always a compromise between tread life and traction,
I've tried to separate the tires into two categories as best I can.
Your individual riding style, weight, modifications, etc. will all
affect performance so this is meant merely as a guideline.
Longer
Life
Bridgestone BT-54
Dunlop D205
Metzeler
ME-Z1/ME-Z2
Michelin Madacam 90X
Better
Traction
Bridgestone BT-56
Bridgestone BT-56SS
Bridgestone
BT-57
Dunlop D207
Metzeler ME-Z4
Pirelli MT07/08
To order free motorcycle tire catalogs the numbers are:
Pirelli/Michelin,
800-722-3336
Dunlop, 800-334-4646
Metzeler, 206-348-4000
General
Info
The stock Bandit 1200 alternator has a power output of
~405watts at 5000RPM. This would put a theoretical limit of
405W / 12volts = 33.75Amps. However; this is *only* if you can
keep the bike above 5000RPM. If you let the bike idle for a
long period of time with too much electrical drain, your battery
would eventually go dead. Also, the main fuse for the bike is
only 30amps. This effectively puts a cap of 30amps on the
entire system. Some list members have been able to run the
bike's normal electrics (headlight, taillight, turn indicators,
gauges, etc.) in addition to heated grips, an electric vest, and
driving lights without a problem. Even so, you should always
check the amount of strain being put on your electrical system before
adding any high-drain electric accessories.
Ignition
Retardation Wire
The Bandit 1200 comes with an ignition
retarder that is designed to reduce engine/exhaust noise in 2nd and
3rd gear to pass noise emission testing. Some Bandit owners
recommend disconnecting this wire to prevent the ignition from
retarding in those gears (and losing power). The connector is a
two way red/black and green/blue wire near the front of the left side
cover panel. Note: This wire is only found on European Bandit
models.
Black
Box Swap
It's reported that putting the "Black Box"
ignition module from a Bandit 600 or Katana 600 into a Bandit 1200
will raise the rev limit and remap the ignition points. This
would likely only be advantageous on Bandit 12's who've been reworked
for more top-end instead of the low-end grunt that they're tailored
for stock.
Instrument
Light Electrical Cluster
The instrument lights are fed by a
gray wire that comes from a large blue connector located directly
behind the windscreen. This single gray wire then travels inside a
sheath with a bunch of other wires down to the area directly below
the instruments. It is here that things get interesting. Four gray
wires (one each from tach, speedo, gas gauge, and ignition switch are
crimped together with the single gray wire and the crimp is stuffed
up inside the sheath the gray wire came down in. This has been known
to cause problems on the Bandit. If your instrument lights are
not working test the circuit. Unsnap the large blue connector
and also unsnap a small connector located directly under the
instruments. (this connector goes to the ignition switch) With a
continuity checker check continuity from the gray wire in the blue
connector to the gray wire in the small connector. If you do
not have continuity then this is the culprit. You'll have to
fix the electrical connections in this bundle to get your instument
lights to work again.
Erratic/Dead
Gauges
Some Bandit owners have reported some problems with
their stock gauges. This is often seen as erratic reporting or
a completely dead gauge. This is often caused by one of two
problems. The gauges are exposed to the elements and can get
water or water vapor inside the unit. This can sometimes cause
a gauge to report incorrectly or not at all. See "Instrument
Light Electrical Cluster" above for another possible cause.
A broken or bad connection can cause one or more instruments to stop
functioning correctly. Also, the connections where the fuel
gauge wiring meets the tank are susceptible to corrosion or
breakage. Check the wire connections on the bottom of the tank
and solder/crimp as necessary.
Intellitronix
Oil Temp
The Intellitronix digital temp gauge and sender
(electric) has been successfully fitted to the Bandit. If you
drill and tap the Allen head oil passage plug on the bottom right
(sitting on bike) front of the engine, you can thread the sender in
there. Alternately, you can pull use a fitting on the left side
of the engine near the left oil cooler line coming from the cooler
into the block. With this method nothing protrudes or shows.
The wire can be routed next to the starter motor into the harness.
Intellitronix
Air/Fuel Mixture Gauge
This is a gauge that works in
conjuntion with an O2 sensor to analyze your exhaust gasses. It
can then indicate how rich or lean your engine is running. This
has been an invaluable tool for many Bandit-Talk members including
those with turbos. The following parts are available from Summit
Racing.
Intellitronix digital air/fuel gauge (bar type): Part
#TH7009 ~$30US
Intellitronix oxygen gas O2 sensor (single wire):
Part #TH8941 ~$35US
(you'll also need an 18mm nut to secure the
sensor)
Rectangular air/fuel gauge availalbe HERE
See pictures and get more info about both Intellitronix gauges HERE
Datel
model #DMS-20LCD-0-DCM
Self powered 3-1/2 digit digital
voltmeter that's available from most electronics parts suppliers. It
has a liquid crystal display so the power consumption is in the
milliamps. Can be mounted on the fairing lip right next to the
vent in the middle. There is an LED version of the same meter.
The physical size is about 1-1/4" x 7/8" so you can mount
it just about anywhere.
Headlight
Modulators
Contact Sound Off Safety Inc. about their SOS
Pulsar headlight modulator
Check out this link for info on building your own headlight modulator. Note that you'll need a decent understanding of electrical concepts and wiring diagrams to do this.
Kriss Industries offers the Starburst headlight modulator
Several Bandit owners have looked into ways to turn off the headlight when the ignition key is set to ON. Note that it is illegal in most US states to operate a motorcycle without the headlight on. The main reason for wanting to switch off the headlight would be for additional voltage on startup. This can be accomplished in a few different ways:
Lockhart
Phillips
Both work by plugging in between the headlight bulb
and the wiring harness connector and operate by cycling the ground
wire on or off.
#400-2175 is a handlebar mount
#400-13296 is a
universal mount
European
Headlight Controls
The European Bandit comes with a passing
switch (yellow trigger which flashes the high-beams) on the left
control-set. The right control-set has a switch that lets you
turn the headlight on and off. The main wiring harness for both
bikes in the same and the parts install very simply.
Left control:
Suzuki part# 3740026E11000
Right control: Suzuki part#
3720033E11000
Both of these part numbers are for non-ABS equipped
models. Note that you must replace the right control in order
to use the left controls pass switch feature.
Motolight,
Inc.
From a list member: "Two small teardrop halogen
fixtures, mount on lower fork legs, 35w apiece; $245.00 plus
shipping, 1 year warranty on everything including the bulbs.
...incredible amount of light...great... in conjunction with either
your low beam or high beam...terrific...in low visibility
situations...first rate quality...complete with all wiring needed and
an on/off switch...Installation is very easy."
PIAA
PIAA
makes several different models of driving lights, several of which
can be mounted to a motorcycle.
The
Hyperlite auxiliary brake light flasher system is available from M &
G Accessories, Inc.
"Developed for BMWs but easily adapted to
other bikes... consists of 16 small, very bright red LED's mounted in
two 1"x1"x 3/4" units (approx), 8 LED's per unit. They
are mounted on any flat rear surface that allows them to be aimed
straight behind you. When you apply your brakes, the Hyperlites flash
very rapidly."
Kriss Industries offers the FireFly II brake light flasher
Brake
Bleeding
After replacing brake parts or fluid, bleed the
system until clean fluid with no air comes out. Drape old towels all
over to catch spilled fluid. A MityVac vacuum brake bleeder is nicer,
available at auto supply stores or from
JC
Whitney #12FE6752W, $26.99 (312-431-6102)
Eastwood Company
(800-345-1178)
Sears auto restoration catalog #8027, $31.95
(800-557-3277)
Fluid
Changes
Brake (and clutch) fluid should be changed
periodically, since it is very hygroscopic and inevitably absorbs
water, which contributes to corrosion in the system. Suzuki
recommends changing clutch and brake fluid every 2 years but wet
climates may require more frequent changes to prevent corrosion. DOT
4 fluid is required. It has higher wet and dry boiling points than
DOT 3, which is also glycol based. DOT 5 is silicone based and is not
compatible with the Bandit's brake/clutch systems.
Pad
Recommendations
EBC greens are given favorable reports. EBC
blacks are less well liked, being rated inferior to OEM. Dale Walker
recommends and sells Ferodo rotors and pads. No reports on
other brands.
Brake
Lines
Several companies offer braided lines to replace the
stock units. Braided lines offer superior brake feel due to the
fact that they cannot swell or expand. They also offer improved
looks and durability. Braided lines are available through Dale
Walker's Holeshot precut to the correct length for the Bandit.
6
Piston Front Calipers
Some list members have swapped 6 piston
brake calipers for the 4 piston stock models. This is reported
to offer better stopping power and brake feel. Nissin, Tokico,
and Harrison all reportedly make 6 pot brake calipers that will bolt
on to the Bandit without problem. Beware that changing out the
calipers will require a *thorough* brake bleeding job. Failure
to get all of the air bubbles out will cause the brake lever to
travel too far and the brakes will feel mushy (and will likely be
dangerous to use). See the "Brake Bleeding" section
for more info. Brakes from the following bikes are reported to fit
the Bandit 1200 (may require shimming with washers):
1996
GSX-R1100, 2000 Bandit 1200.
Replacement
Brake Rotors
OEM replacement rotors for the Bandit tend to run
several hundred dollars. Most list members recommend getting an
aftermarket replacement or a replacement from a salvage yard.
Suzuki RF900's use the same rotor as the Bandit 1200 does. Not
only are aftermarket rotors much cheaper, they are generally just as
good - if not better - than the stock units. Companies like EBC
and Ferodo manufacture aftermarket brake rotors, while Ron Ayers
Motorsports can generally get the OEM units for 5-50% less than your
local dealer will probably charge.
Brake
Dive
The Bandit has a reputation for having bad front end dive
under heavy braking. This is generally caused by the too-soft
front fork springs. See the Suspension section for more info on
curing this problem.
Gold
Pipes
The Bandit has exhaust pipes made of stainless steel,
not chromed steel like many other bikes. Stainless steel has a
tendency to turn gold with heat. This is perfectly normal and
nothing to be alarmed about. In fact, most owners like the gold
color as it matches the gold logo on the fairing and the gold on the
brakes. While it can be polished away, this is a temporary fix
as the gold will slowly return once the pipes get hot again.
Many people have reported black stains on their headers behind the
front tire. This can be easily cleaned with Mother's Aluminum
Polish or Simichrome and 000 steel wool.
Ceramic
Coating
Some list members recommend ceramic coating your
header. Ceramic coating keeps the pipes cooler and often gives
a horsepower boost. It will also prevent the header from
changing color and most companies guarantee their coatings for life.
One list member says that he can touch his coated header pipe right
at the motor without burning his hand only minutes after performing a
run at the track. Dale Walker now offers a header for the
Bandit 600 and 1200 that is Jet Hot ceramic coated. For more
info on ceramic coating contact:
Airborne
Coating
Swain
Technology
Jet
Hot
Holeshot
Vortex
Holeshot
makes an aftermarket stepped header for the Bandit 600/1200.
The unit gives a more than 50% weight savings and a good boost in
horsepower. It comes Jet Hot coated in a high luster silver.
Holeshot
Vortex
By
far the most popular aftermarket canister on the market. It's
designed to fit both 600 and 1200 Bandits. The biggest
difference between this pipe and others is that it comes with a tube
which eliminates the heavy stock elbow pipe. This is a weight
savings of 7lb. over stock. In addition to weight savings, this
pipe generally gives 12-13 horsepower and 9ft-lb of torque over stock
without rejetting (Bandit 1200). The Vortex comes in a 4"
diameter, not the 4.5" diameter offered by most aftermarket
pipes. Highly recommended.
RF900RR
Canister
The exhaust canister from the Suzuki RF900 will fit
the Bandit with some slight modifications. The RF can is much less
restrictive than the stock Bandit unit and generally gives power
gains without being as loud as other exhausts like the Holeshot
Vortex. You will need to reuse the stock Bandit exhaust gasket (the
one between the muffler and the intermediate tube). Part #14181-31E00
If you ever need to remove the Bandit bodywork (and you will) it's recommended that you put a light coat of white lithium grease on the securing tabs before reinstalling. This will make it easier to remove the bodywork next time and will help prevent cracking the bodywork or breaking off any retaining tabs.
Japanese
Logos
Some Bandit owners have put Japanese Kanji characters on
their bikes similar to the characters on the side of the Hayabusa.
These graphics (and pretty much everything else you can think of) are
obtainable from Tapeworks.
Unfortunately there are so many variables involved that there is no general consensus among list members as to what works best, and finding one you like is likely to involve some experimentation. Larger models offer more protection but more adverse effects on stability, handling, top speed, and possibly visibility. Models that are designed, or can be adjusted, so that the air stream breaks clean from the edges, rather than churning up a lot of turbulence, will be quieter and more comfortable. Having your helmet entirely in a clean air stream will produce less noise and buffeting than having the top inch in a paint-shaker turbulent zone. Your height & posture also are factors, as is your helmet; some are quieter than others. Getting Gold Wing-like protection may well require something so large you have to look through the plastic, which will result in at least some reduction in vision. There's always at least a little distortion, and it goes downhill from there as bugs, road grime, and scratches accumulate or if it rains. Popular replacements for the stock unit include:
Lockhart
Phillips
Lockhart
produces a windscreen that is the same size and shape as the OEM
original, but comes in a dark smoke tint.
Zero
Gravity
Produces
a stock-size replacement as well as larger models. Many list
members report success with the 2"-over model, though there is
one report that the mounting holes were not properly positioned.
This screen generally offers less wind on the shoulders and torso but
slightly more helmet buffeting.
2" larger smoke color - Part
#12-170-02
Secdem
This
is a European company which offers a screen that is approximately the
same size of the stock shield but has a "flip-up" at the
edge to direct airflow higher. This shield is carried by
different companies depending on where you are in Europe. This
is also available through a Canadian company. Click HERE
for info.
BS 057 HP - 97.57 Euros
Cheetah
SST
This windscreen is manufactured by National
Cycle
and is approximately 4" taller than stock and slightly wider
than stock. ~$50US
Buell
Cyclone Flyscreen
This screen is used by many "naked"
Bandit owners. It is just big enough to cover the gauges and
deflect some of the chest blast that comes from riding a naked bike.
You can buy it direct from your local HD/Buell dealer unfinished.
Keep in mind that you will need to have the screen painted (which can
cost more than the parts themselves) or paint it yourself. Part
numbers are as follows:
Part# 59772-97y Fairing $42.95
Part#
59745-97y Rt. Brkt. $ 3.75
Part# 59746-97Y Lt. Brkt. $ 3.75
Holeshot
Flyscreen
This
is essentially the Buell Cyclone screen with brackets made to fit the
Holeshot Headlight Retro kit.
Part# B-WFS $84.95
Fairing/Naked
Swap
The easiest way to convert your Bandit from a faired
model to a naked model (or vice versa) is to find someone from Europe
or Canada who is looking to add an S-model fairing to their bike.
Many Bandit owners have successfully swapped parts across the border
and ended up with a bike that suits their tastes better as well as
being just a little different from the rest. You may also be
able to find the necessary parts to complete a conversion from a
salvage yard.
Holeshot
Headlight Retro Kit
This
is a kit offered by Dale Walker's Holeshot which features a custom
bracket and carbon-look headlight bucket. It is different in
appearance from the stock unit. This product features built-in
mounts so that you can preserve your original turn signals and an
optional flyscreen. Also note that this light is frame mounted,
not fork mounted. This is unique in the fact that the light
points straight ahead when you turn the handlebars.
SV650
Headlight Conversion
Click
here for a how-to article on this procedure
Emgo
Brackets and 7" GS/GSX Headlight
The Emgo brackets are
universal and designed to fit a headlight to most any bike.
They must be "altered" a bit to fit on the Bandit but you
can get the brackets and headlight for under $30US if you source a
headlight from the salvage yard.
Many companies, including Lockhart Phillips and Motorcycle Accessory Warehouse, offer fairing lowers to fit the Bandit. A few owners have seen these lowers on other bikes and found them to be of poor quality. For now, none of these pieces is recommended for use.
Basically,
a rear wheel hugger is an inner fender that is attached to the rear
swing arm. It is designed to keep dirt off the rear suspension
and provide aerodynamic assistance by reducing drag from the rear
wheel. Truth be told, most people just buy them because they
look so cool. Several companies make huggers to fit the Bandit
600 and 1200. See links below for more info.
PowerBronze
Hugger
Many
list members use the Sigma 800 and Sigma 1200 bicycle computers.
They are extremely accurate (even at high speeds) and feature clock,
odometer, trip-meter, top speed, speedo, average speed, etc.
depending on which model you purchase. Wireless models are also
available at additional cost. These are available at your local
bicycle shop or through www.nashbar.com.
From
~$20US depending on model
Katana
Clip-ons
The clip-on handlebars from a 1989-90 Katana
reportedly fit the Bandit 600 without much modification. This
swap significantly lowers and narrows handlebar height. Pricing
varies but the needed parts can usually be obtained from a salvage
yard for $50-100. These will not fit the B-12 without machining
as the B-12 uses 2mm larger fork tubes.
Alternate
Handlebars
Many companies make replacement steel and aluminum
handlebars for the Bandit including K&N, Holeshot, and others.
Some bars are designed for comfort while others are designed with
less rise for a more sporty feel. Which bar is right for you
will depend on what you're looking for out of the swap. Compare
the stock rise and pullback versus the bar that you're looking for.
Keep in mind that if you change handlebars, you may have to get
extended brake/clutch/electrical lines. Also, your hands/grips
may come in contact with the fairing or gas tank if the bars are too
extreme.
Stock bars - 2" rise, 4" pullback
Other
available bars:
AFAM Aluminum bars (no longer produced)
Drag
bars from National Cycle
K&N Superbike Bars (no longer
produced)
Renthal Ultralow bars
Holeshot bars
Kimpex
The
Kimpex heaters are thin, flexible pieces of printed circuit heating
element that you use with your own grips. This has the advantages of
letting you use any grips you want. You can replace your grips
without buying new heaters, and they are much cheaper than regular
heated grips. They came from the snowmobile world, so that's another
source of dealers if you want to get some. Installation of the
heating elements is easy, just take the old grips off, clean the
handlebar surface, peal off the backing paper from the heaters and
stick them on your handlebars. Handlebar grips slide on easily if you
lube them with some alcohol. It dries faster than water or soap and
the grips stick nicely. You can use the Euro light connector up
by the instrument cluster (unused on US models) for power. Be sure to
mount the resistor for the heater elements someplace where it will
get cooling air. Another thing to note is that one heater will
have a higher resistance than the other. You should mount the
higher resistance (least hot) heater on the throttle side as the
plastic sleeve for the throttle acts as an insulator and requires
less heat.
Kimpex Part #912025 ~$25US.
Motorcycle Acc.
Whse Part# 12170
Dennis Kirk Part# 39-31 (snomobile catalog)
May
be available from your local dealer
Givi
(Invisible) Mounting
One common complaint about Givi luggage
is how ugly the rack is on the bike when the bags are not on. Larry
Betts suggests the following: Remove the rack except for the hard
part (the part under the rear body work). All you need to do do to
make this easy is drill a couple of holes in your rear fender as a
place to mount the GIVI rear turn signals. I used the long hex bar
and a little hardware to act as a spacer between them and mounted
them flush to the fender. Looks really trick and you can reinstall
your rack in less than 10 minutes whenever you need it. The two
pieces of hardware that stay on the bike are totally invisible.
Wolfman
One
list member recommends Wolfman luggage. This company offers a
wide variety of luggage including tankbags, tailpacks, and saddle
bags.
Givi
Givi
makes several different models of luggage that will work on the
Bandit. The most recommended of these is the E460 (46 liter)
top case. It comes with provisions for an optional second brake
light (around $20 USD). This taps into the stock brake light
wiring and works quite well. The topcase and rack stick out over the
stock brake light which can make it hard for drivers to see. The
second brake light is at eye level for drivers, so they respond to it
better. Owners report that the handle can be a bit
uncomfortable when carrying the case off the bike. The case can
be mounted using either the E140 Wingrack or the newer N140
Wingrack. Some list members have reported the need for longer
bolts in order to mount the Wingrack securely. One advantage of
these bags is that they use the Givi Monokey system which enables you
to get saddlebags that share a key with the top case. Prepare
to pay a premium for this luggage as it is top quality. Givi
also
sells stick-on second brake lights for use with any other bag, but
they don't look quite as integrated and possibly could fall off.
Emgo
Cycle Travel Trunk
This is a Givi-like hard bag which is
designed to attach to a tail-rack. It looks very similar to
Givi luggage and even has the red reflective band around the rear
portion. It comes with a base plate that is designed to be
mounted to a luggage rack of some sort. The box snaps into
place on the base plate and locks. To remove, you unlock the
box from the base plate with the supplied key and push down a round
release button. Installation and removal both take about 5
seconds. Very quick and easy. The trunk is large enough
to hold a full face helmet and leather coat and is reported to be
very leak proof. Some list members have successfully attached
this bag to the Suzuki OEM luggage rack but this is not recommended.
The Suzuki rack is rated at 4.4lb max weight which is not much more
than the empty trunk. It's also very small - barely big enough
to mount the trunk's base plate. The preferred mounting method
would be to purchase the Givi tail rack and mount the bag to it.
JC
Whitney #01AA7126N
~$79.95US
11.5"H X 19"W X 16.5"L
Eclipse
Fastpack Tailtrunk
This bag is available for about $65 and
features a shoulder strap and adjustable bungee system. It is
reported to have enough room for an overnight trip, though exact
carrying capacity is unknown.
General
Info
Most riders recommend magnetic over bungee/strap-on bags
due to their versatility and ease of use. This is especially
important on long trips where the bag must be removed to refuel.
As with any bag, you must be very careful when installing or removing
the bag to prevent scratching the tank. Also, you should make
sure to check the bag before each use to ensure that no sharp or
rough objects have become embedded in the bags mounting surface.
You should also keep in mind that tank bras can cause magnetic bags
to not say put.
Chase
Harper
These bags come in many different styles and colors.
They are a bit more pricey than some other bags but are extremely
durable and well thought out.
Marsee
This
is another recommended maker of tailbags and tankbags. They
have an entire line of bags available at:
http://www.marseeproducts.com/
Messenger
Bags
Timbuk2
is a San Fransisco based company that produces some very nice
messenger bags - designed and used by bicycle messengers. The
'El Ocho' comes highly recommended by several list members. It
measures 18" wide by 10" high and has an adjustable
harness. This same company offers other messenger bags in
different sizes and styles.
Replacement
seats often require the use of some pieces from the stock seat (the
Corbin, for instance). If you want to be able to quickly interchange
your stock and aftermarket seat, you'll need the following pieces:
1
"Striker plate" P/N: 45210-26E00. ~$18US
2 "Washers"
P/N: 08212-06201 ~$2US
Hella
"The
only mod you will have to do is clip the tabs between the wire leads
for the horn connecter cause the blade terminals are father apart on
the Hella horn, they plug right in. I drilled another hole in the
horn mounting strip to bring the horn up in the fairing and put a
slight "s" bend in it to clear the edge of the fairing. I
don't know if you can mount it with the fairing on,I had mine off
along with the forks so it installed easily. Longevity- I've had one
in my Honda for about 5(tundra) years and it still keeps blasting.
The silver dulled a little but I didn't want a chrome one either."
Available
from Performance Unlimited Motoring Accessories at a discount for
Bandit-Talk list members. Ask for Paul and tell him your from
the Bandit E-mail list.
$25.75 (20%off) +shipping - no tax
Hella
part# is 66006
Air
Horns
Some list members have reported success with air horns.
Things to look out for with this type of horn are relay problems (air
horns require a relay, make sure your horn comes with one) and
mounting issues. Since air horns are larger, they can be
somewhat more difficult to mount than a stock or Hella unit,
especially on unfaired bikes. Make sure to mount the horn
facing partially downward so that water does not pool inside the
horn. You should also be careful not to block airflow to the
oil cooler since some air horns are relatively
large.
www.wolo-mfg.com/
There
are only two known tank bras available for the Bandit. One is
the Suzuki OEM model, and the other is the Lockhart Phillips model.
Both have received favorable reports from list members. The
Lockhart is reportedly available in both a full and half cover while
the Suzuki unit is only available in the half version. The
Suzuki version also has the word "Bandit" scripted on it in
the same lettering as the OEM decals. Because the 600 and 1200
Bandits both use the same tank, parts made for one will fit the
other.
Suzuki bra (96-99): Part #99950-64025 ~$30US
Touch-up paint can be obtained either through your local dealer or directly through Color-Rite (which supplies the dealer and factory). Color-Rite can be contacted at 800-736-7980.
Bandit
Color codes:
Candy Academy Maroon - 22U
Dark British Green
Metallic - Y7G
Dusk Blue - Y0N
Pearl Novelty Black -
33J
Charcoal Metallic (engine and wheels only) - 35W
Many list members report that the blue from 96 Geo Prism's is an exact match for the blue on the Bandit. This is GM color "Pacific Blue 47U WA 302C"; PPG aftermarket code 5146.
Triumph
Fork Protectors
These can be purchased at any Triumph dealer
for ~$15-20US. They are basically just a small piece of plastic
which sits over the fork seals and directs wind, rocks, and bugs away
from the part of the fork which the seals normally contact.
Triumph
part# A9641005 fits Bandit 600.
Triumph part# A9641010 fits the
Bandit 1200.
The 2001 B12 comes with fork protectors and should fit the 96 to 00 B-12. Not sure if the 2001 B6 has them or not, but if so, should fit the older B6's also.
Napoleon
Bar End Mirror
Users
have reported mixed reviews on these mirrors. Apparently the
standard levers *may* hit part of the mirror stalk if pulled all the
way in. One list member reports that the mirrors do not stay on
well. However, the author has these mirrors installed on his
Bandit 1200 and they seem to work fine. The are much better
looking than the "bug antennae" stock mirrors but get
extremely buzzy at higher RPM's making them virtually useless on the
highway. These mirrors are available at most motorcycle supply
shops.
Napoleon
Black Out Mirrors
These
are sold at a number of places (including Holeshot) and are much
nicer looking than the stock round mirrors. They come in a
short and long stemmed version.
Lockhart-Phillips
Bar End Mirror
Part
#108-100
These mirrors are reportedly fairly expensive. They
are round and fit 7/8" handlebars. Look to be of high
quality but may be cost prohibitive. No reports available.
Constructors
Hindsight
Bar End Mirror
These
are nearly identical to the mirrors available at Lockhart-Phillips
and are priced similarly. No reports available.
Ken
Sean GPX Mirrors
These are black, rectangular, long stem
mirrors that fit the Bandit.
~$12US from Dennis Kirk
DK Part #:
39-261 (R), 39-260 (L)
Slipstreamer
Mirror Mount Adapter
These are sold for their aftermarket
windscreens but work well to extend aftermarket mirrors so that you
see more than your elbows. They screw into the stock mirror
mounts and extend them up about 1.5 inches. They have a hole in the
middle for mounting the windscreen hardware (not needed in this
application) and they are very solid because they also act as
windscreen mounts. They are painted black and do not appear to add
any vibration.
The Slipstreamer part number is '010Y' or (in older catalogs) A1Y, and they only sell one type of mirror adapters, so it's tough to get it wrong. Available from Chaparral for $10.99. They are also available in Europe from M&K for about £5.
GSXR
Mirrors
At least one list member has successfully mounted GSXR
mirrors to the Bandit fairing. Unfortunately, said Bandit has
since been wrecked so we have no pictures or reports to post.
Kryptonite
NY Chain
You can buy the very same chain that Kryptonite uses
for much less money via McMaster-Carr. This is handy if you
need a length other than 5.5 ft (the only length that Kryptonite
sells) or if you already have a lock. The bare chain is priced
at ~$9US/foot and can be obtained through McMaster-Carr's web site.
You can also get a nylon sleeve to cover the chain for ~$2US/foot.
Click here for a document on Winter storage
Click here to read about Drag Racing tips, rules, and regulations
Motorcycles
must be completely emptied of fluids (gas, oil, etc.) before they can
be shipped. See the link below for more details:
MotoDirectory
shipping companies
Click for an article on importing motorcycles to the US from Canada. This article is written about the Suzuki SV 650 but most of the info should pertain to the Bandit as well.
Carb
Synch Tool
The most highly recommended carb synch tool is the
Morgan
Carbtune II.
This has been recommended by several list members as being better
than mercury and guage-type tools and was the recommended tool in a
RiDE magazine carb synch tool shootout. Many list members
advise against mercury tools because of the possibility of breakage
and the toxicity of the mercury in the tool. The Carbtune is
said to give the best of both worlds as it does NOT use mercury.
Valve
Adjustment Tool
This tool works on the B-6, B-12, 750
Katana's, and GSX-R's
Available through authorized Suzuki
dealers for ~$5US
Suzuki Part# 09917-14920
Mikuni
Pocket Tuner
Available from Dennis Kirk for ~$6US
Part
#28-189
Compression
tester
JC Whitney features the following:
Compression
tester for all motorcycles. Includes 10mm, 12mm, and 14mm long
reach adaptors.
Part# 14AJ7807N $27.95
Motion
Pro Pilot Adjustment Tool
This tool is designed to make
carburetor pilot adjustment easier. It's a special, angled
screwdriver that helps keep you from getting frustrated and burned
when working on those carbs. Craftsman makes a similar tool.
No part number or price available on the Craftsman model.
Chaparral
Part#315-8119 ~$22US
Tire
Repair
Note that these are only meant as short-term repairs.
Whenever you have a problem with your motorcycle tire, you should
remove it for repair/replacement as soon as possible. These
kits will, however, get you on the road again in an emergency.
It generally takes 6 or more CO2 cartridges to inflate a completely
flat rear tire.
"Fix-A-Flat"
"Fix-A-Flat"
type products are NOT recommended. Some of these use flammable
gas for the propellant. Also, these products generally use some
sort of "goop" to coat the inside of the tire and fill in
the puncture hole. When you take the tire in for repair or
replacement, the shop will either decline to work on your bike
because of the mess inside or they may possibly charge you extra as a
cleaning fee. Make life easier on yourself and your mechanic
and forget about these products.
Engine
Powered Pump
There are some pumps on the market which inflate
your tire with air from the engine. Basically, they work by
installing a one-way valve into a sparkplug hole and running a hose
to the engine. The advantages of these kits is that you never
run out of air (so long as your engine will run) and they are fairly
compact and light. The disadvantage is that most kits have a
very short hose length that will not usually reach the rear tire.
Removing the entire rear wheel to fix a simple puncture is not my
idea of fun.
"Moto
Pump Ultra Flat Tire Inflator"
Chaparral part#
307-0616 - $12.99
Comes with 1 cartridge. Go to your
nearest sporting goods store and purchase a five-pack (or two) of
cartridges (~$7US/pk.) and then go to Wal-Mart or other discount auto
parts place and buy a sealed pack of Gooey strips for radial tires
(~$2) and an installation tool set (~$4).
"Progressive
Suspension" tubeless kit w/inflator
Chaparral Part#
307-0609 - $21.99.
"I don't like the complete kit style
because their repair plugs are real short cone shaped things and are
harder to install. On the other hand, the Progressive inflator
pump has an adapter hose (flex hose) that may work better on a front
tire where getting around the brake rotor may be difficult."
RK
Chain Riveter
The instructions that come with the RK unit are
more detailed than those of the Motion-Pro rivet tool and include
photos and illustrations. However; the RK tool is not
multi-purpose. It only rivets while the Motion-Pro rivets and
breaks chains. It has a solid (not hollow, like the MP)
threaded ram and a cone shaped anvil (the part that flares/crimps the
pins). It's marked with a line around the cone to indicate
proper insertion depth when the crimp is done. It is
specifically designed for 520-632 O-Ring chains - not smaller.
Prices vary by region but this tool is fairly expensive.
Motion
Pro Chain Riveter
Available through Chapparal or JCWhitney.
The JCWhitney model is cheaper and comes with press plates to press
the side links on. The Chaparral tool does not have this part.
Dale Walker can also get this tool for a good price.
Cost:
~$55-65US
Motion-Pro
Chain Breaker/Side Plate Press
Very heavy duty looking.
The tools work well and are not very expensive. Having these
tools is far superior to using a C-clamp or Dremel tool with a
cut-off wheel.
Click here to download Convert for Windows. This is a freeware program that will convert from English to Metric and vice versa. It can handle most everything from Torque to Temperature. Note that it comes as a .zip file so you will need a utility like WinZip to install/use the program. Also, this program will only run on Win9x or better (NT will probably work but has not been tested). Win3.x/Linux/Mac is not supported.
Check out http://www.x-rates.com/ to convert monetary values such as British pounds (£) to US Dollars ($).